


Finding the original Colors of my House
What were the original colors of my house? This is often the first question that a homeowner will ask a heritage consultant when faced with repainting (or staining) their old house.
Finding those colors is often a tricky procedure. A Heritage Consultant can do an extensive on-site research, taking samples from various architectural elements of a house, noting where they were taken from, and inspecting the samples under a microscope. The samples are carefully matched with each other, layers are coordinated, fading allowed for, and paint colors from the (usually) original color scheme are finally carefully matched to modern available paints. A colour image is produced by the Consultant to show the homeowner client what the original color scheme looked like on the house itself.
If a home owner wants to find the original colors, but do not have a Heritage Consultant to call on for help, there is an alternative method of finding the color information of your house that you can do yourself.
Known as “the bull’s eye method”, it is a technique that a careful, methodical person can do by himself or herself. The “bull’s eye method’ consists of sanding down areas of the paint on the outside of the house in a shallow circle, exposing a “bull’s eye” of all of the paint layers all the way down to the wood. These “bull’s eyes” should – ideally – be around four inches (10cm) across, and be made with sandpaper, giving it a final rub with very fine sandpaper.
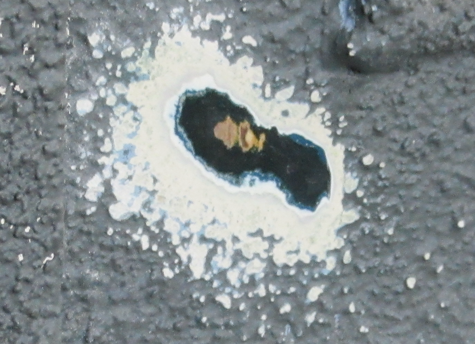 This example – on rough stucco – shows an original pale ochre colour as the first layer; then a really dark green-black; a couple of shades of blue; white; pale grey; then a grey-green. The original colour of pale ochre can now be restored. This sample is only about two inches in length. A quick rub with some clear mineral oil has returned the colours to their original intensity.
Choosing where to make the “bull’s eyes” is very important. You have to choose the area of a house that is most protected – not just from the sun, which is probably the most important consideration – but also away from any area that may have been scraped clean by enthusiastic painters in the past.
The best locations are on the north side of a building, under eaves, and in difficult-for-a-painter-to-reach places. You are trying to expose areas of paint that retain all of the paint layers that have ever been applied to your house. Remember that paint on old houses probably contains lead, so use a facemask; do not breath the dust, and research your local environmental bylaws about removing large quantities of lead paint – if the whole house has to be scraped for example.
You should reveal several “bull’s eyes”– at least two on each building element for comparison purposes – on the siding, the trim, the sash, shingles if any, porch floors, porch ceilings, anywhere in fact, that there might have originally been a different colour on the house. After revealing the “bull’s eyes”, you want to look carefully at each area that you have sanded. Rub a little clear mineral oil over each “bull’s eye” with a clean rag. This aids to replicate the original oil content of the paint, and reveals a truer colour than the dry sanded finish.
Interpreting the “bull’s eyes” can be a little tricky. Take some time and compare all of the different “bull’s eyes” and take notes of the layers on each building element. Cross-reference the color layers on a piece of grid paper. See which layers line-up with other layers. Does that grey paint layer appear as a middle layer in all of the “bull’s eyes”? Is that medium yellow only on the siding? Is the sash dark green? What about that light cream colour on the bottom next to the wood? Is that an undercoat, and not the first paint color?
Good paint jobs on old houses almost always used undercoats. White lead and red lead undercoats were frequently used and can be initially confusing when trying to find an original paint scheme. There are historic houses that have been incorrectly “restored” to their undercoat colors. Try not to make that mistake!
Original paint colors will fade in sunlight, they get dirty, and they can oxidize, changing a green layer to one with a blue-ish hue for example. You can inspect suspect color layers with a magnifying glass and a scalpel to check the colours deeper within a layer to make sure of an original color.
After determining the colors of the house from your “bull’s eyes” try to match your colors to paint that is locally available. Make sure that all of the colors work together. Look at the colors you have chosen and adjust slightly if necessary. They had good color sense when your house was built, and like you, they wanted an attractive over-all appearance.
Choose good quality paints – after all, it’s the labor that is time consuming and/or expensive. The price of good paint is usually a smaller part of the cost of repainting, and a sound investment.
Some tips:
- Even good paint fades, so choose paint just a little brighter than what you think is right, so when it fades it will still look good.
- Especially for dark colors, try to use factory-mix paints. These usually are made of ground earth pigments, rather than “squirt-into-the-can” pigments, and are therefore more durable and keep their color longer. Ask at a good paint store which paints are factory mixed.
- Wherever possible – especially for dark colors – avoid transparent bases for your paint. The coverage is not good – needing up to seven coats of paint for a burgundy color that covers properly. (See tip above!)
- Preparation is everything! Painting over old paint ensures that your new paint will not last as long as painting over clean scraped wood. The different expansion and contraction rates of the various paint layers will loosen the paint layers and help them to crack and flake. Take care when preparing for repainting.